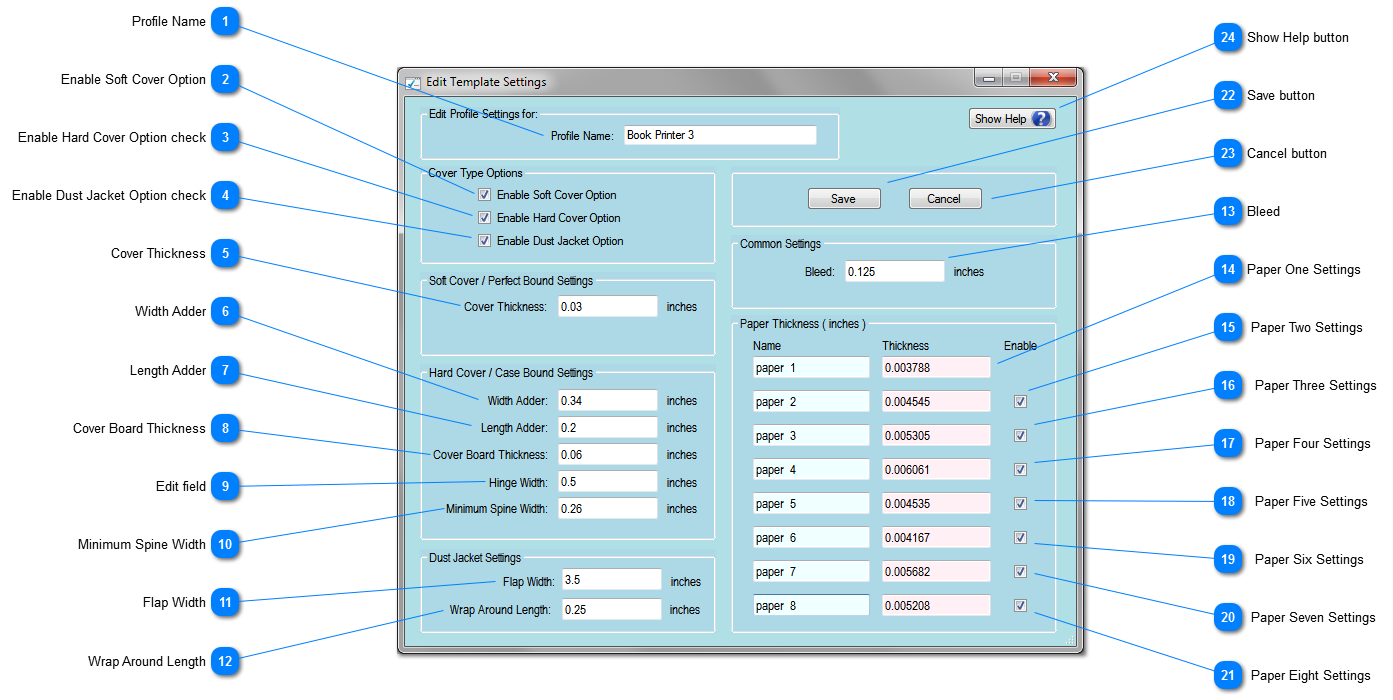
Enter the amount to add to the width of the page size to determine the overall cover width. Refer to the book printer's specifications. (Hard Cover / Case Bound Settings)
Enter the amount to add to the length of the page size to determine the overall cover length. Refer to the book printer's specifications. (Hard Cover / Case Bound Settings)
Enter a name for the paper in the blue box and the thickness of the paper in the pink box. Refer to the book printer's specifications. Note this paper will always be enabled to be used in the Paper Type selection drop down. (Paper Thickness group box)
Click the check box to enable this paper to be used in the Paper Type Selection drop down on the Template Generator window.
Enter a name for the paper in the blue box and the thickness of the paper in the pink box. Refer to the book printer's specifications. (Paper Thickness group box)
Click the check box to enable this paper to be used in the Paper Type Selection drop down on the Template Generator window.
Enter a name for the paper in the blue box and the thickness of the paper in the pink box. Refer to the book printer's specifications. (Paper Thickness group box)
Click the check box to enable this paper to be used in the Paper Type Selection drop down on the Template Generator window.
Enter a name for the paper in the blue box and the thickness of the paper in the pink box. Refer to the book printer's specifications. (Paper Thickness group box)
Click the check box to enable this paper to be used in the Paper Type Selection drop down on the Template Generator window.
Enter a name for the paper in the blue box and the thickness of the paper in the pink box. Refer to the book printer's specifications. (Paper Thickness group box)
Click the check box to enable this paper to be used in the Paper Type Selection drop down on the Template Generator window.
Enter a name for the paper in the blue box and the thickness of the paper in the pink box. Refer to the book printer's specifications. (Paper Thickness group box)
Click the check box to enable this paper to be used in the Paper Type Selection drop down on the Template Generator window.
Enter a name for the paper in the blue box and the thickness of the paper in the pink box. Refer to the book printer's specifications. (Paper Thickness group box)
Click the check box to enable this paper to be used in the Paper Type Selection drop down on the Template Generator window.
Enter a name for the paper in the blue box and the thickness of the paper in the pink box. Refer to the book printer's specifications. (Paper Thickness group box)
Click to save changes to the selected settings profile. Window will close and display either a confirmation message if the save was successful or an error message if a problem with saving the settings was encountered.